Wednesday, September 25, 2013

Bike Friday Blue color options

The above bike is 2-color Ink Black (Gloss) and Sky Blue Sparkle. Sky Blue Sparkle is $100 extra on pocket bikes like the Tourist, Llama, Rocket and is a nice semi-metallic baby blue. With the black it really looks good. This bike has Black cables, but I've seen it with yellow, gray, white and green and all of these work well.
Here's a great example of a two-color Tikit with Sky Blue Sparkle, Premium White and black cables/decals. Love the white painted rack! Too bad you can't get white tires any more! This paint job would be $250 on a Tikit or $200 on a Pocket bike like a Tourist, Llama or Rocket.

In the foreground, Leo Blue Cobalt, on the right with green handlebar is the Midnight Blue, in the background on the Tikit is the Cream Soda Blue.
Here's a closeup of the Cream Soda Blue showing the excellent look of the paint in outdoor conditions. Indoor this color is somewhat muted and dull, but outside it looks FANTASTIC!

The Leo Blue Cobalt is a combination of Sugar Grape Purple with all of its fantastic metallic flakes and a sapphire blue overcoat. This produces an extremely deep, active paint color. This color is $250 extra on pocket bikes like the Tourist, Crusoe, Llama, Rocket.
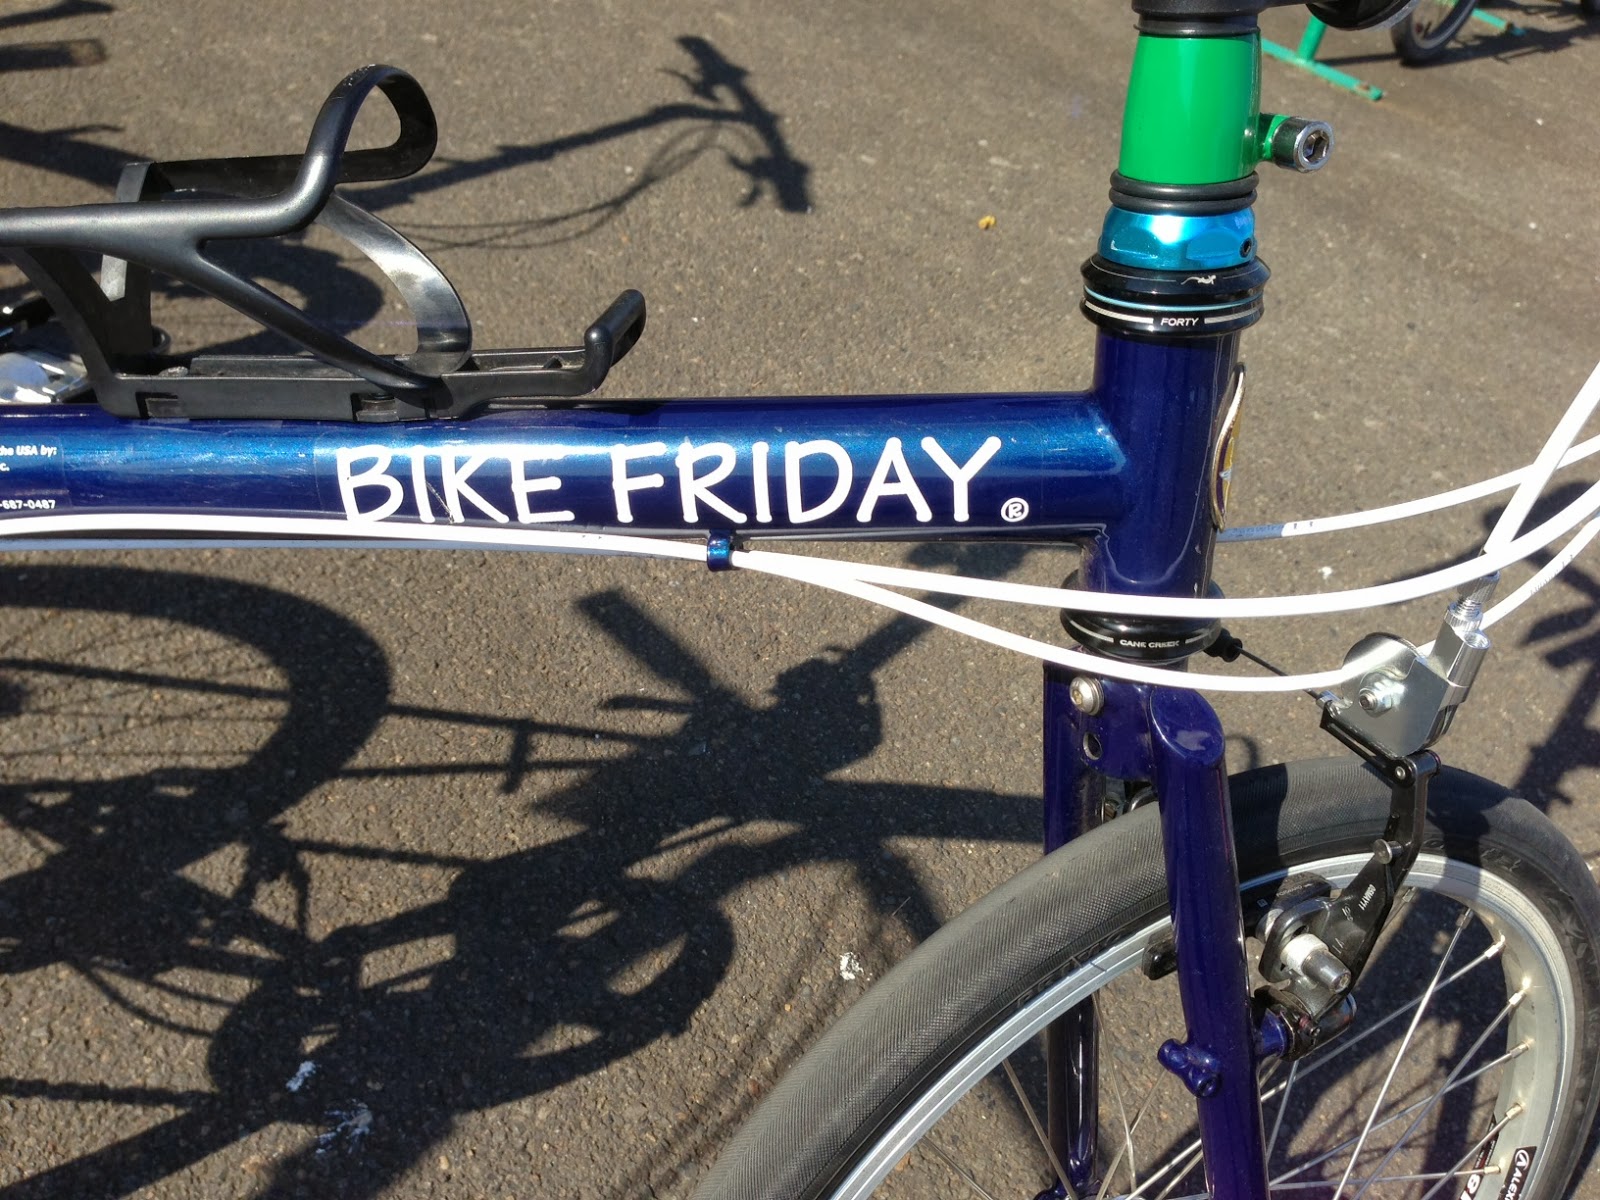
This is a close-up of a Midnight Blue bike. Midnight is a similar 2-color paint using Black Diamond overpainted with Sapphire Blue. The Black Diamond paint also has an active metallic flake look so the paint has a very nice depth to it. The sapphire overcoat produces a nice even blue color that looks great in all lighting situations. This color is also a $250 additional fee.
The bike in the forground is my son's bike. Sapphire Blue. This color is really fantastic and though my bike (white in the background) costs over 3x more expensive than my son's and my special 2-color paint job cost more as well... I have to say that I'm a bit jealous of his paint job. I love the Sapphire. In some lights it looks nearly purple, in others a bright cyan.  Awesome is all I can say!  Sapphire also costs an additional $250.
Here's a closeup of a Sapphire Blue tandem in the flourescent lights of the shop just finishing up assembly. This was literally the best-looking tandem I've seen. And I've seen a lot of them. Love that color!

Check out this awesome 2-tone one of my customers ordered. The front 1/2 of the bike (fork, steering tube, monotube) is Sapphire Blue, the rear triangle and seat mast is Midnight Blue. It looks really awesome. All it needs now is the natural leather grip tape on the handlebars to really finish it up well!

Tuesday, September 24, 2013

Bike Friday Handlebars Options

I regularly am asked to send email photos of a photo of our different handlebar options so I thought it might be prudent to upload several of them here so we could just send a link.

This photo shows the top down version of the H-Bar with Trigger shifter and V-brake levers.

Here's a photo from the side showing the bar end of an H-bar.

This is a photo of the NWR Flat Bar Road which is a variant of the H-bar with a slight upward bend at the end of the bar. We often use a reverse brake lever common on Triathlon bikes here. These levers are road-pull so we then need to use Mini-V brake calipers to work. This photo shows a trigger shifter on the bottom end (Alan's Knuckle shifters), but we regularly mount a bar-end shifter to the end closest to the rider (right).

Here's a side-view of the NWR Flat Bar Road showing the upward bend. We also make another variant which sweeps upward much more dramatically (STI Touring bar) and allows you to mount an STI lever like Shimano Ultegra integrated levers. This bar will not allow that type.
This shows the NWR bar with the more typical bar end shifter. If the bike is a single-chainring front, the left side bar end is an excellent place for a mirror.

This is a common upgrade to a flat handlebar. This particular grip style is made by Ergon bikes and is their model GP-3 which includes a lock-on style grip (bolt on) and a bar end that is ergonomically designed for comfort. These come in two diameters, small or large and run from $32 to 60-ish cost-wise.

Standard 5-degree flat handlebar. Works fine for most casual use riding. This particular bar is mounted by the use of a Quill stem which allows adjustment up and down. We do this type of stem on the Companion and OSATA models for 2014.


This is a great comparison between the STI touring bars (left) and the NWR Flat Road bars (right). The STI bar has a much more pronounced upsweep.

This photo shows the STI Touring bar with a bar end and reverse brake levers. We commonly use Shimano or Sram integrated brake/shift levers on this type of bar as an alternative to Drop Bars.

Here's a photo of a drop bar with Shimano Tiagra integrated shift/brake lever (STI).


Thursday, July 19, 2012

Bike Friday's First DuraAce 7900 bike

Just yesterday, we shipped out the first of its kind, DuraAce 7900-equipped Pocket Rocket to a customer in the New York area. The bike has been a labor of love from the beginning. The customer supplied the integrated shifters, the rear derailleur and the crankset. All other components were sourced by Bike Friday.

Up to now, the newer Shimano stuff including DuraAce, Ultegra and 105 have not been used on Bike Fridays since the internal cable routing of the shifter, the shorter cable pull have not worked well with the needed double bend down by the bottom bracket. That coupled with the long cable housing created too much friction to work well with our bikes.

Shimano has developed a new cable that is nano-coated to create much less friction and so will work not only with our bikes, but also with Tandems, some Racing Trikes and the like. Were it only a problem for Bike Friday, this problem probably would have gone without a repair and we would've kept selling Sram or Campy as a solution to the integrated shifter problem.  Thankfully, some of the larger brands like Trek, Cannondale and others, have had problems with the new shifter performance on their tandems and such - and so we now have another option to give our customers.  I think for the most part, we'll only offer such an option when someone is particularly set in their desire to use Shimano-eqiupped bikes and/or they want a triple crankset and 10-speed cassette.

And now to the photos!

Here's the build tag and parts bag including the built-up wheels. The rims are Alex R390, Xtralite Capreo Hub by Chosen in black, black spokes. Pretty sweet. These are the black version of my personal rims.

Here's a bike after cutting. This is not the exact bike since it was further back in the shop than I'm allowed to go... but you get the idea. We organize the bikes on this rack to be able to quickly tell if everything is there.

Here's the main body of the bicycle, painted and ready for assembly and alignment.

Here's the seat mast, fork and steering tube of the bike, ready for assembly.
The bikes wait on this rack after paint (powder coat).

Our production employees take great pride in their work and put a lot of time into each bike to ensure everything is just right. The rear end of the bike is being assembled here with the front of the bike.

Here's a photo of the complete main frame, awaiting alignment.
The seat mast and steering mast will be added next.

Here's a close-up of the parts kit showing the handlebars (these will be split for easy packing in a suitcase), crankset, seatpost, etc.

Here's the bike in our cabling station being assembled.

Our engineer, Rob (right), is assisting in the assembly of the bike to ensure correct fit and shifting performance.

Here's a very short video showing the challenges of setting up the new DuraAce shifters - the braze-on front derailleur was at a weird angle and was corrected for good shifting performance.


Here's a photo of the rear end of the bike. Beautiful!


Monday, April 30, 2012

Bike Friday - Custom Bike for TiMoney

Well, now that my day job has moved from The Ink Well to Bike Friday, I wanted to take a few minutes to talk about my cycling passion.  I've been at Bike Friday (BF) for just over a month now and have learned a ton about bikes. I already considered myself an expert when it comes to mountain bike parts and such, but now I'm becoming a more well-rounded expert... particularly when it comes to travel bicycles and bicycles for commuters.

One of the first few bikes I sold was to a really cool guy named Tim who lives on the East Coast. He called in one day and wanted to order a bike to allow him to cycle while he travels. He travels often (5x or more per year) and right now isn't able to explore his destinations by bike, but that's about to change!

Tim wanted something with an Internal Hub (changes gears inside the rear hub) and that would allow him to go really fast. There are a number of internal hubs available, but few that will allow a really good gear range (most allow you to go fast up hills, and decently quick on flat ground, but not on downhills... The SRAM Dual Drive allows you to have even more range than your typical triple-chainring system, but with the simplicity of a single ring in the front and a single rear derailleur.  It's got an awesome sound too!

Here are some pics of the bike in process:
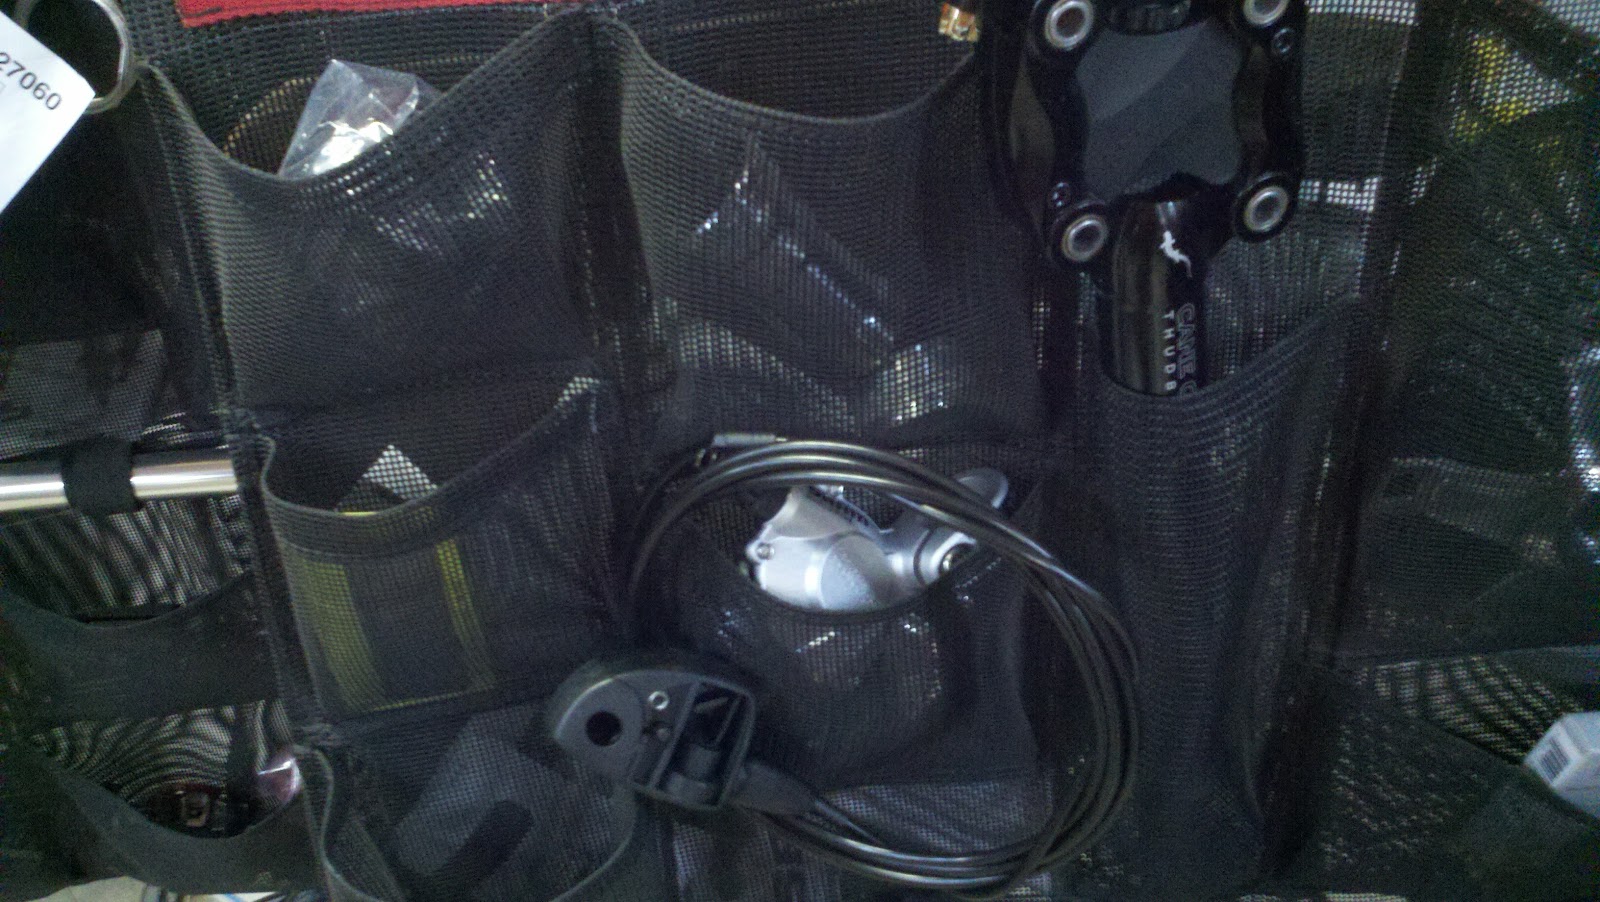
Each bike gets "Kitted" which means the complete bike is put into this bag prior to going out to production. The Kit includes the wheels, and all parts for the bike. We pre-order the parts so they're ready and waiting to be put on the bike once the frame is built up.

This shows the suspension seat post a "Thudbuster ST" and the Dual Drive actuator.


One of the things I knew Tim would appreciate is the "Gold" chain.  I think this ultra-light and durable component really sets the bike apart.  I want one for my bike!

The wheels were waiting for assembly prior to the bike build at the wheel station. At BF, the wheels are laced by machine, then hand-trued by our master wheelsmith. I love the fact that the front hub is Shimano XT. Very nice stuff!

After the bike is cut, it's put onto this rack so that the brazer can quickly assess that all pieces are correct and ready for the brazing process.

These are shots of the brazing process (sort of like tack-welding the pieces in place prior to doing a full weld)

In this shot you can more easily see the finished frame on the assembly jig. Tim's bike has a "Heavy Rider Upgrade" which means that the large oval tube and the rear seat-stay / chainstay loop uses thicker-wall and slightly oversized tubing. It's easily identifiable prior to being powder-coated since it has a darker color and has writing on it. 

Don't look into the light!   ... But it's so beautiful! Zap!

Here's a close-up shot of the fork on the welding stand.

Above is a close-up of the mono-tube near the base of the folding seat mast.

Above is a shot of the bottom bracket including our stamped frame number. To the left is the top of the folding seatmast with brazed-on clamp.

Once the bike is brazed, welded and powder-coated, areas that require bolts are drilled out, then the frame is aligned. Using calipers and exacting measurements, each frame is hand-aligned.

Once the frame is aligned, it goes to the assembly station to have all of the parts put on. This is the bike in its near finished form.  Notice that Tim got a special custom 2-color paint job. He requested black fork with his Orange bike. He has an orange Camaro and I suspect this will look pretty awesome sitting next to it... or inside of it.  Not too many full-sized bikes can go into the back of a Camaro. But, a Bike Friday can!

This shows a close-up of the Cane Creek Solos Headset. This is the same one I'm putting on my new Bike Friday. It's a high quality headset that won't break the bank. The headset takes a lot more torque on our bikes due to the long steering mast, so it's really important to have a high quality one.

This shows the Sram X-7 rear derailleur and the smokin' gold chain!

I love the color-matched chain protector!

This shows a close-up of the SRAM DualDrive Hub.  All of our frames come with a pre-brazed trailer attachment. It takes a standard air-compressor nipple and works very well.

Here's a shot of the finished bike after the test ride, just before it went into the packaging stage.

Once I get a photo from Tim, I'll add it below.  More to come!

Thursday, February 2, 2012

Latest projects at Cameron Graphix

My two latest projects at Cameron Graphix have been very successful and I'm proud to introduce the new sites to you all. The older of the two, which still has some work to be done on it is www.PegasusPizza.net - this site was a full web site with menu - they previously had a simple one-page site with a downloadable menu. They also had a place to enter your e-mail address for a future mailing, but there wasn't any capture device on the back end, so all of the addresses were disappearing instead of forming into a usable database.  The color scheme is based on their new interior design in their restaurants, their new logo and the new menus I designed for them.

My second project is www.ExceptionalMD.com and is nearly complete. I did a full website, marketing materials, logo and forms package for them and am still working on small changes nearly daily. Much of the work has been done over the phone with the client and I would work then upload the changes... he would then hit refresh in the browser. The process worked very well for me and for him as well. Exceptional Health Care is a new type of medical practice (in Oregon) and is the first in the State to be Certified by the State of Oregon as a Retainer Medical Practice. They focus on the customer / patient and for a small retainer fee, you have access to a medical Doctor whenever you need him, regardless of your insurer or whether you have insurance at all.  It's a really great concept and if you have insurance or a Doctor you're unsatisfied with, you may want to give them a call: 541-746-7073. They're on Coburg Rd. in Eugene.

Wednesday, July 20, 2011

Using RSS Feeds to post Blog to HTML page

I had a hard time nailing down a good service to use for this during the process of creating a new web page for a client. I wanted to create a basic brochure site that had an area on the home page for user-editable content and I didn't want to use Wordpress or some other service like that.

What I found is a great service called WebRSS here's the URL: http://www.webrss.com/ basically, you have the blog address, go to their site and then post one of four different technologies to the page. I tried using the PHP, iFrame and Javascript and finally ended up using that. It works really great and is highly customizeable. The feed refreshes every hour and looks great. Give it a try!

Saturday, March 19, 2011

Color separations for printing.

So, yesterday I had another "professional designer" (for questions about why the quotes are here, view my first post below) submit a file for printing. I placed the file into InDesign to set up the press sheet and viewed the Separations preview to verify that all colors were correctly called out and the file was good to print.  Sadly, that's a no on this file.  This happens all too often... almost daily... sometimes hourly : (

As a designer, setting up a file to print on a desktop printer or being posted to the web is really easy.  It's similarly easy to set things up for printing, but it's important to keep in mind the process when doing this.  When a file is created using, say, three colors that will be going on a traditional offset press, it's critical to be sure that those three colors are appropriately color-coded in the original document.  This may seem like an easy thing to do, but it's regularly not done.

I think it's important to understand where a graphic design element or project will be used prior to creation.  For instance, I regularly see logos that are created in Photoshop, then the customer sends me a 21K JPEG that they want placed on their 6' x 3' outdoor sign.  Remember, VECTOR, VECTOR, VECTOR when it comes to logos.  With today's modern vector graphics programs there isn't too much that you can't do in a vector drawing program.

So, with the project yesterday, the artwork was vector, all colors were appropriately set up, were this project to be going on our full-color press, but that isn't the case. They have specific Pantone colors they want to use and unfortunately, some colors don't match exactly in a CMYK printer versus a custom-mixed Pantone color.  There's an excellent color theory article that explains these terms in more detail - here's a bit of it:

As you might suspect, there are different types of color. Now is when you can throw the color wheel out the window.

RGB Color: This is color based upon light. Your computer monitor and television use RGB. The name "RGB" stands for Red, Green, Blue, which are the 3 primaries (with green replacing yellow). By combining these 3 colors, any other color can be produced. Remember, this color method is only used with light sources; it does not apply to printing.

CMYK Color: This is the color method based upon pigments. "CMYK" stands for Cyan, Magenta, Yellow, and Black (its what the K stands for). Using these 4 colors, most other colors can be achieved. Unfortunately, CMYK cannot reproduce the same amount of colors as RGB can, which is why yellow-greens sometimes look a bit muddy when printed.
This is the method used by printers the world over, and is also a clever way of mixing paints.

Pantone (PMS) Color: This is yet another printing color method. PMS stands for "Pantone Matching System," and is a large list of specially mixed colors made by the Pantone Corporation. Instead of using CMYK to create colors, the pigments are created individually for purity.
For example, if I wanted to use a Red-Violet color, I'd pick PMS 233M. The color would be made exclusively for my project and would always print exactly how I want.
The only drawback to using PMS colors is that they're only useful for projects with few colors. They're also expensive.


Ford, Ryan. "Color Theory: A Brief Tutorial." Color Theory: a Brief Tutorial. 2007. Web. 19 Mar. 2011. <http://colortheory.liquisoft.com/>.